
Views: 0 Author: Site Editor Publish Time: 2025-08-25 Origin: Site


You can transform your closet with a wardrobe tube and enjoy more organized storage. This closet DIY project feels simple, even if you have never tried it before. Many beginners spend about four to five hours on the full process, but you might finish faster with easier installation steps. You only need basic tools. When you install the tube the right way, your closet will feel sturdy and look neat.
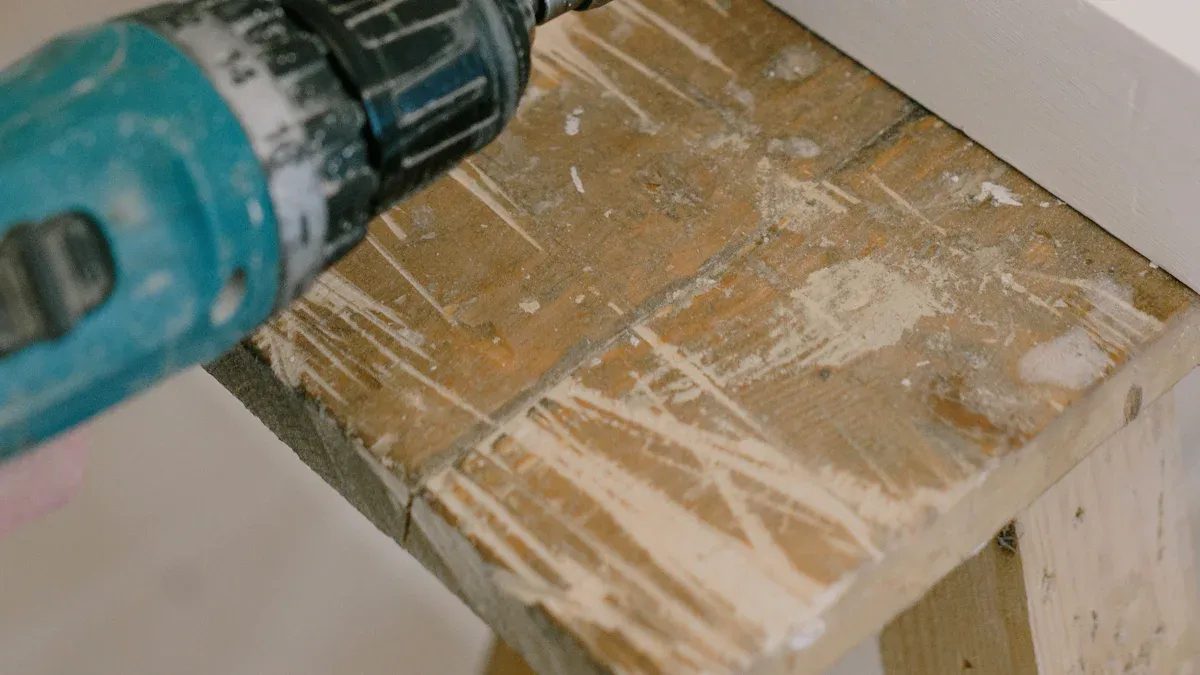
Get simple tools like a drill and screwdriver. You also need a level, tape measure, and safety glasses before you start.
Measure your closet with care. Mark where the supports will go. This helps make sure the tube is straight and strong. It will fit your closet well.
Attach support brackets to wall studs. You can also use strong wall anchors. This helps hold heavy clothes. The tube will not sag or shake.
Put a center support if your wardrobe tube is longer than 32 inches. This stops the tube from bending. It makes the tube stronger.
Check if your tube is steady by pressing on it. Hang some clothes to test it. Add neat touches to finish. Your closet will look nice.
Before you start, you want to make sure you have the right tools and materials. This helps you work faster and get a strong, long-lasting result. Let’s break down what you’ll need.
You don’t need fancy equipment to install a wardrobe tube. Most of these tools might already be in your toolbox:
Power drill or cordless drill: Makes drilling holes and driving screws easy.
Screwdriver: Handy for tight spots where a drill won’t fit.
Hammer: Useful for tapping wall anchors into place.
Level: Helps you keep everything straight and even.
Tape measure: Makes sure your measurements are spot-on.
Saw (fine-toothed or circular): Lets you cut the tube or shelf to the right length.
Stud finder: Finds the studs in your wall for a sturdy install.
Pencil: Marks where you want to install the pole cups and supports.
Safety glasses: Protects your eyes while you work.
Tip: Always wear safety glasses when you use power tools or cut materials.
Choosing the right materials makes a big difference in how strong and durable your closet will be. Here’s what you’ll need:
Wardrobe tube: Pick a heavy-duty steel or high-quality aluminum tube. These materials hold more weight and last longer. Steel tubes with a 1-5/16 inch diameter can support up to 250 pounds and resist sagging.
Pole cups or supports: You need these to hold the tube at each end. For longer spans, add a center support.
Screws and wall anchors: Use the right type for your wall. Drywall needs anchors, but you can screw directly into studs for extra strength.
Center support (if needed): If your closet is wide, a center support keeps the tube from bending.
Painter’s tape: Helps prevent chipping if you need to cut a wooden shelf.
If you care about the environment, you might want to look at the materials you choose. Here’s a quick comparison:
Aspect | Wood Tubes | Plastic Tubes | Metal Tubes (Steel/Aluminum) |
|---|---|---|---|
Durability | High | Low | Very High |
Eco-Friendliness | Good | Poor | Good (if recycled) |
Longevity | Long | Short | Very Long |
When you install the pole cups, make sure they are level and secure. If you need to install the pole cups on drywall, use wall anchors for extra support. Quality materials and careful installation help your wardrobe tube last for years.
Getting the measurements right is the secret to a sturdy and neat wardrobe tube install. You want your closet to look professional and work well for years. Let’s walk through the steps together.
Start by clearing out your closet so you can see both walls. Grab your tape measure and measure the distance from one side wall to the other, right where you want the tube to go. Write down this number. If you plan to use an oval wardrobe tube or a closet tube, make sure you measure the inside width, not the outside. This helps the tube fit snugly between the supports.
Tip: Always measure twice to avoid mistakes. If your closet walls aren’t perfectly straight, measure at the front and back. Use the smaller number for your tube length.
Now, let’s figure out where to place the supports. Most people install a single rod at about 60 inches from the floor. If you want double rods, mark the first at 80 to 82 inches and the second at 40 inches. Leave at least 1 inch between the shelf and the support so you can slide hangers easily.
Here’s a simple way to mark your support placement for an even install:
Use a long level to draw a straight line just below the top shelf height.
Apply blue painter’s tape along this line. It keeps your wall clean and gives you a clear spot to mark.
Find the studs with a stud finder. Mark bracket positions on the tape, about 2 inches above your line.
Drill the bottom screw first, leaving it a bit loose so you can adjust the bracket.
Remove the tape, then tighten the screws to lock the bracket in place.
This method helps you get a level, secure fit for your tube. If your closet floor isn’t even, always measure from the shelf or use a level instead of the floor. Double-check everything before you drill. A little extra time here saves headaches later!
You’re ready to install the closet pole supports. This step is where your closet starts to take shape. If you want your wardrobe tube to hold up for years, you need to secure the supports the right way.
Start by holding the support brackets against the wall where you marked earlier. You want to anchor them into wall studs whenever possible. This gives your tube the strongest base. Here are the most reliable ways to secure your supports:
Anchor the brackets directly into wall studs. Space them every third stud or about every 4 feet for heavy loads.
Use heavy-duty shelf brackets or specialized pipe fittings if you expect to hang a lot of clothes.
For extra strength, overhead supports suspended from structural members above the ceiling work well. Iron rods with hooks can hold the clothes rail securely.
If you can’t find a stud, you’ll need wall anchors. Not all anchors are created equal. Take a look at this table to see how much weight each type can handle:
Anchor Type | Weight Capacity (lbs) | Notes |
|---|---|---|
Plastic Expansion Anchors | < 25 | Suitable for light loads only |
Molly Bolts | 25 to 50 | Medium loads |
Threaded Drywall Anchors | 25 to 75 | Medium to moderately heavy loads |
Toggle Bolts (in 1/2" drywall) | 200 to 300 | High holding strength; suitable for heavy loads like TVs or shelves |
Toggle Bolts (into steel studs/drywall) | ~150 per anchor | Recommended for heavy objects; good resistance to dynamic loads and popout |
Drywall Screws into 25ga Steel Studs | Minimum 100 tension, 250 shear per screw | Strong support; multiple screws increase capacity; best for static loads |
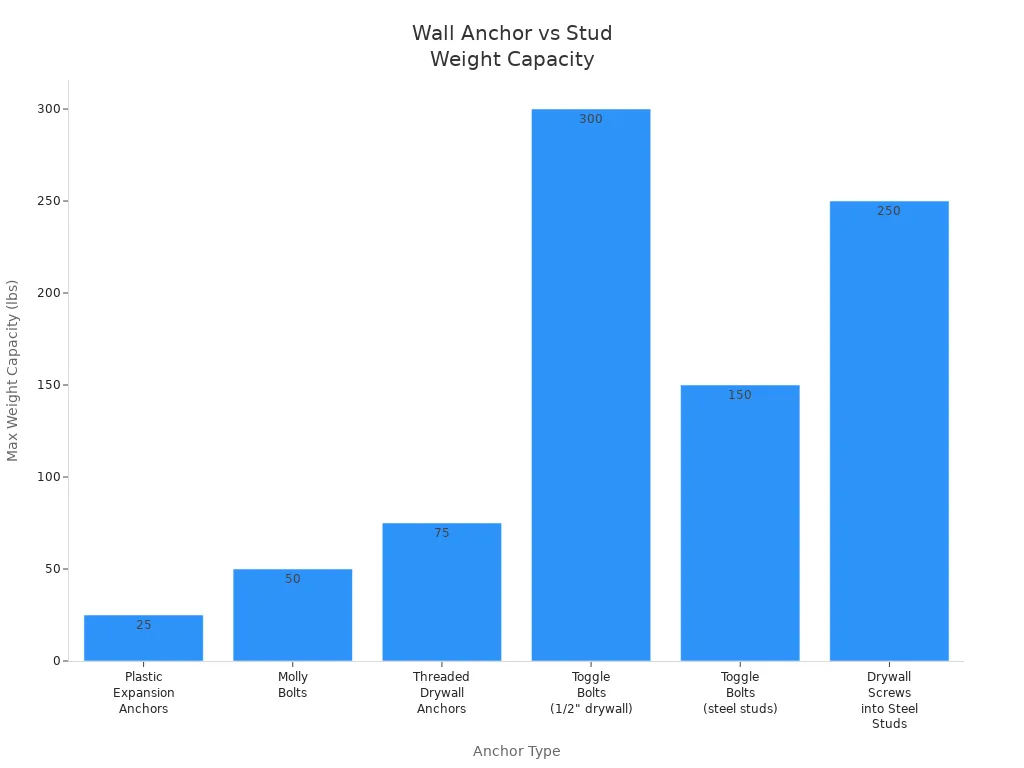
You can see that toggle bolts and screws into steel studs offer much more strength than plastic anchors. If you want your wardrobe tube to hold heavy coats or lots of shirts, always choose the strongest option available.
When you pick your support brackets, look for zinc alloy or steel. Zinc alloy brackets resist corrosion and last a long time. They come in finishes like chrome, bronze, and silver, so you can match your closet style. Steel wardrobe tubes and brackets are strong and keep their shape under heavy loads. Some brands offer custom colors and sizes, so you can get exactly what you need.
Tip: Always double-check that your supports are level before you tighten the screws. A crooked bracket makes your tube sag and look messy.
No-drill options exist, like adhesive brackets or tension rods. These work for lightweight loads or temporary setups. If you want a permanent solution, drilling into studs or using heavy-duty anchors is best. No-drill supports can slip or pop out if you hang too many clothes.
Not every closet needs a center support, but many do. If your wardrobe tube is longer than 24 inches, you should add a center bracket. This keeps the tube from bending or sagging in the middle.
Industry standards say you should space mounting brackets every 32 to 48 inches for steel rods.
If you use an aluminum tube, place brackets closer together—about every 24 to 36 inches.
Center supports help your closet pole handle more weight. A steel rod with center supports can hold 150–250 pounds when installed correctly.
If you install the closet pole in a wide closet, measure the distance between supports. If it’s more than 32 inches, add a center bracket. You can find center supports that match your end brackets, so your closet looks neat.
Note: Center supports are easy to install. Just mark the spot, drill into the stud or use a strong anchor, and screw the bracket in place.
When you finish this step, your supports should feel solid. Give each bracket a gentle tug to make sure it’s secure. Now you’re ready for the next step—cutting and mounting your wardrobe tube.
You want your wardrobe tube to fit perfectly in your closet. Start by measuring the distance between the inside edges of your support brackets. Write down this number. Always double-check your measurement before you cut.
Here’s a simple way to get a clean, straight cut:
Use a pencil to mark the full circle around the tube where you want to cut. This helps you keep the cut even all the way around.
Secure the tube with a clamp or vise. This keeps it from moving while you work.
Pick the right tool for the job. For small tubes, a pipe cutter works great. For bigger tubes, use a fine-toothed saw.
After you cut, smooth the edges with a file or deburring tool. This step keeps your hands safe and stops sharp edges from scratching your clothes.
Tip: Take your time when you cut. A slow, steady hand gives you the best result.
Now you’re ready to install the tube. Slide one end into a support bracket. Lift the other end and fit it into the opposite bracket. If you have a center support, guide the tube through that as well.
Check that the tube sits level. Use a small level if you have one. If the tube looks crooked, adjust the brackets before you tighten everything down. Once you’re happy with the fit, secure the brackets fully.
Give the tube a gentle shake. It should feel solid and not move around. If it wobbles, check your brackets and tighten the screws. Now your closet is ready for clothes!
You want your new closet setup to last. After you mount the wardrobe tube, test its strength before loading it with clothes. Start by pressing down gently on the tube with your hands. If it feels solid, try hanging a few heavy items, like coats or jackets. Watch for any movement or sagging. If you notice the tube shifting or the supports pulling away from the wall, check your screws and anchors. Tighten them if needed.
Tip: Always secure brackets into wall studs when possible. Wall anchors help in drywall, but studs give the best support. Steel or aluminum brackets work best for heavy clothing, while zinc alloy brackets resist rust in damp spaces.
If you use an adjustable system, you can move the tube up or down to fit different clothing types. Adjustable brackets make it easy to change the height if you want to reorganize later. This flexibility helps you keep your closet neat and makes it simple to store bulky or delicate items.
You can make your closet look like a pro installed it. Here are some tips for a polished finish:
Use fascia molding to cover gaps between cabinets and the ceiling. This gives your closet a built-in look.
Choose soft-close doors and hinges. They keep things quiet and protect your closet from wear.
Pick finishes that match your home. Textured melamine or wood grain adds style and feels modern.
Add glass doors for a sleek touch. Smoked or clear glass lets you see your clothes and keeps them safe.
Personalize with drawer pulls and matching flooring. Small details make a big difference.
Want more ideas? Adjustable shelving lets you change your storage as your needs grow. You can add shelves for shoes or baskets for accessories. Watching video guides can help you see each step in action.
A well-finished closet not only looks great but also makes your daily routine easier. Take your time with the final touches, and you’ll enjoy your new space for years.
You just learned how to install a wardrobe tube in your closet. With the right prep, anyone can do this project. Keep your closet strong by checking for loose parts and cleaning it often. Want to make your space even better? Try adding these popular options:
Built-in ironing boards
Wire drawers for easy storage
Shoe shelves or clear boxes
Velvet-lined drawers for jewelry
Laundry sorters and garment organizers
Enjoy your new, organized closet!
A wardrobe tube made from steel can hold up to 250 pounds. If you use a center support, your closet tube will stay strong and resist sagging. Always check the product label for exact weight limits.
Yes, you can use an oval wardrobe tube. Many people like the look and strength of oval tubes. They fit most closet tube supports and give your closet a modern style.
You need a fine-toothed saw or a pipe cutter to cut a wardrobe tube. For an oval wardrobe tube, use a clamp to hold it steady. Always wear safety glasses when you cut.
If your wardrobe tube is longer than 32 inches, you should add a center support. This keeps your closet tube from bending. Oval wardrobe tubes also need center supports for wide closets.
You can use tension rods or adhesive brackets for a wardrobe tube. These work for light loads. For heavy clothes or a permanent closet tube, drilling gives you the best results.


