
Views: 0 Author: Site Editor Publish Time: 2026-06-19 Origin: Site


We have all heard an ominous crack in the middle of the night. Sagging rods and collapsed shelves under heavy winter clothing cause massive daily frustration. A failing closet infrastructure instantly ruins your morning routine when you cannot easily find your clothes.
Structural hardware serves as the unsung foundation of long-term closet organization. Beautiful storage bins and velvet hangers matter very little if the underlying framing ultimately fails. You need robust support systems to hold heavy loads safely over the years.
Upgrading to the correct Wardrobe Bracket setup maximizes your vertical space and absolutely prevents catastrophic structural failure. Reliable hardware enables boutique-style, customized garment sorting tailored perfectly to your specific needs. You will finally build a highly functional space designed to last for decades without bending.
Most builder-grade closets rely on an incredibly basic infrastructure. Contractors often install a single long rod spanning from one wall to the other. They rarely include center support. Over time, gravity exerts relentless pressure on this unsupported span. We call this the "bowing effect." The rod begins to dip in the middle. Your clothes inevitably slide toward this central depression, crushing together in a tangled mess.
Adding a strategically placed support alters these load-bearing dynamics completely. The hardware interrupts the long span. It shifts tension away from the weak center point and transfers the heavy load directly into the wall studs. You eliminate the dangerous bowing effect instantly. You also protect your walls from severe drywall damage. When rods bend, they pry the end mounts out of the wall.
Rigid, stable rails dramatically improve how you manage your daily routine. A sturdy framing system delivers several major organizational impacts:
Common Mistake: Many homeowners try to fix a sagging rod by replacing it with a thicker wooden dowel. They ignore the support hardware entirely. Even solid oak will eventually bend over a 60-inch span if you load it heavily. You must address the underlying support structure first.
Your closet layout dictates your exact hardware requirements. You cannot use a one-size-fits-all approach. Different zones require different structural solutions. Selecting the right Wardrobe Rail Bracket ensures maximum safety and optimal space utilization.
End flanges secure the extreme ends of your hanging rail. You install them directly into the opposing side walls of your closet. They create a secure anchor point for the entire system.
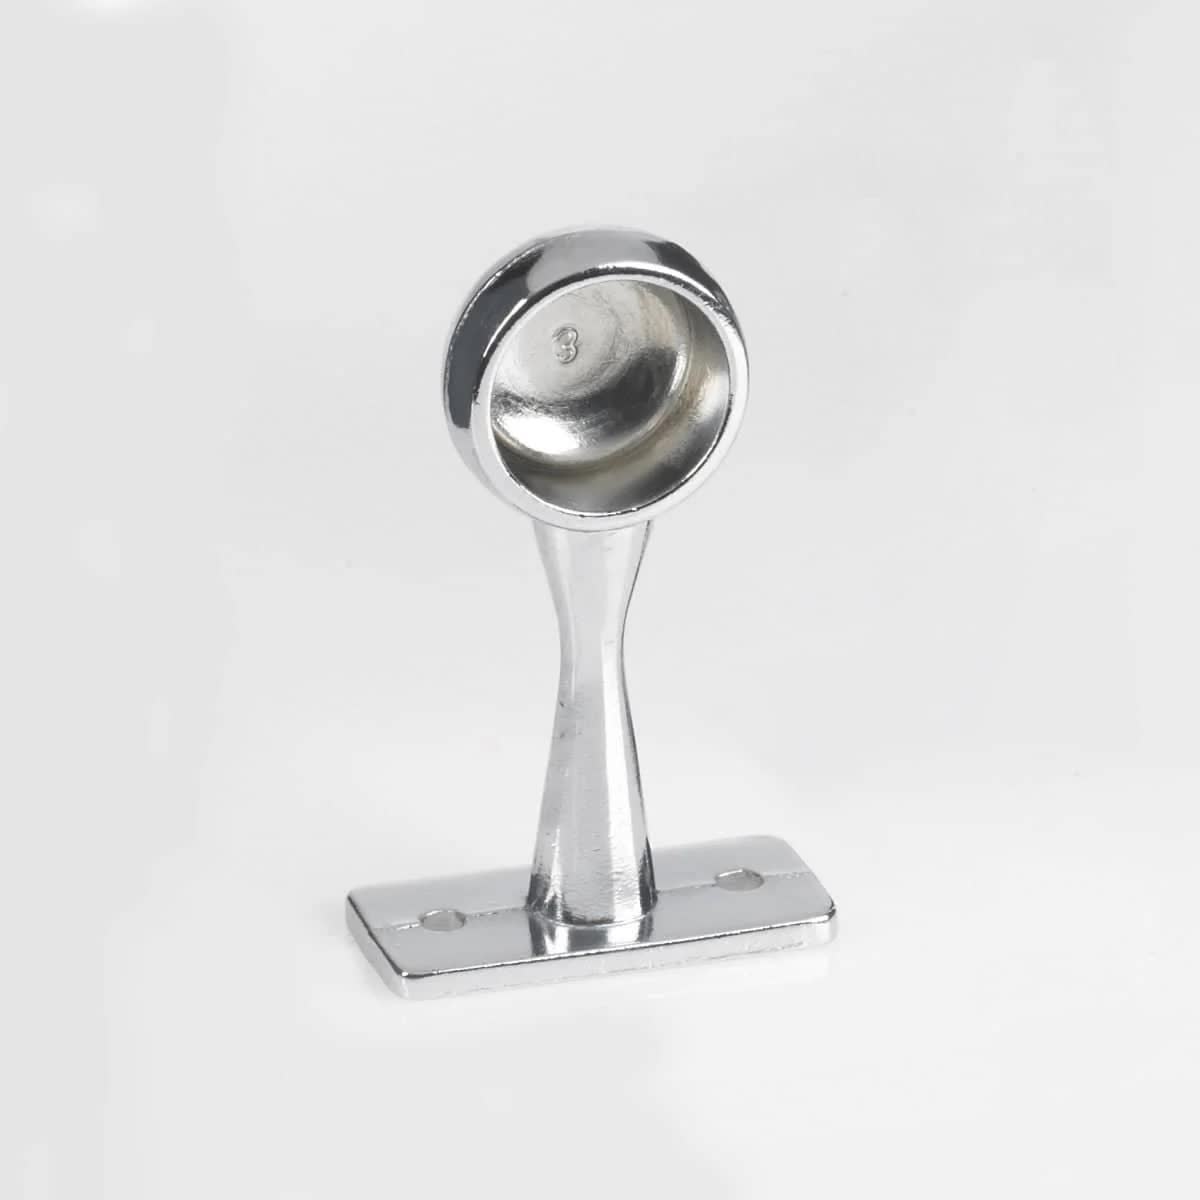
These components sit midway along your rail. They attach to the back wall and reach out to cradle the rod.
Combo systems represent the gold standard for vertical space maximization. The hardware features a flat upper surface for a shelf board and a lower hook or loop for the hanging rail.
Sometimes you cannot anchor hardware into a back wall. Sloped ceilings or existing custom shelving can block your access. Top-mount brackets hang vertically downward.
Hardware Layout Summary Table:
| Bracket Type | Primary Application | Key Advantage | Notable Limitation |
|---|---|---|---|
| End Flange | Side-wall anchoring | Conceals raw cut ends of rails | Requires narrow spans |
| Center Support | Mid-span reinforcement | Prevents rod bowing completely | Blocks hangers from sliding past |
| Shelf-and-Rod Combo | Dual-purpose storage | Maximizes vertical space | Requires precise leveling |
| Ceiling Mount | Under-shelf mounting | Perfect for custom islands | Harder to install solo |
Evaluating hardware before purchase saves you enormous frustration later. You must consider material density, manufacturer ratings, and physical dimensions. The wrong choice leads directly to collapsed shelves.
You will typically find three core materials on the market: heavy-duty plastic, die-cast zinc, and stainless steel. Plastic works adequately for lightweight children's clothing or guest rooms. However, we strongly recommend solid metal for primary hanging zones.
Consider your winter clothing weight. An average wool coat or heavy winter parka weighs between three to five pounds. A dense row of 15 winter coats easily exceeds 60 pounds in a very concentrated area. Plastic supports will warp under this relentless pressure. Die-cast zinc offers excellent rigidity for standard adult closets. Stainless steel provides ultimate commercial-grade durability.
Material Comparison Chart:
| Material Type | Durability Level | Best Use Case | Cost Factor |
|---|---|---|---|
| Heavy-Duty Plastic | Low to Medium | Guest rooms, linen closets | Very Low |
| Die-Cast Zinc | High | Primary adult closets | Moderate |
| Stainless Steel | Maximum | Heavy winter gear, commercial | High |
Manufacturers print specific weight limits on their packaging. You must read these numbers carefully. They usually represent a "static load rating." This means the hardware can hold that weight if the items remain perfectly still.
However, we interact dynamically with our closets. You push, pull, and drag clothes across the rail. This sliding motion creates dynamic tension. A support rated for 100 pounds static might only handle 50 pounds dynamically.
Furthermore, you must view weight ratings with healthy skepticism. A bracket rated for 100 pounds will only hold 100 pounds if you anchor it deep into a solid wooden stud. If you use basic drywall anchors, you severely reduce the capacity. The hardware itself might not break, but the entire assembly will rip violently out of your drywall under heavy loads.
Hardware fitment tolerances matter greatly. Standard closet rails typically measure either 1 inch or 1-1/4 inches in diameter. You must match your hardware exactly to your rail diameter.
If you force a large rod into a small loop, you scratch the finish. If you place a small 1-inch rod into a large 1-1/4-inch support loop, you invite danger. The rod will rattle every time you grab a shirt. Over months, this constant friction creates metal shavings. The loose fit also allows the rod to twist, causing the end mounts to slowly work themselves out of the wall.
Flawless hardware cannot compensate for poor installation techniques. The actual mounting process requires precision, patience, and a solid understanding of home construction basics.
Relying purely on toggle bolts or plastic wall anchors for your primary rail support represents a high-risk approach. Drywall consists merely of compressed gypsum dust wrapped in thick paper. It possesses almost no structural holding power against a downward pulling force.
You must locate the vertical wooden studs behind your drywall. Studs provide exceptional anchoring strength. Use a high-quality electronic stud finder to map your walls before you drill any holes. If your ideal hardware placement falls between two studs, you should adjust your layout or install a horizontal wooden cleat across multiple studs first.
Industry standards provide clear spacing guidelines for safe closet builds. You should install a primary support every 32 to 48 inches along your rail.
You must maintain adequate depth clearance from the back wall to the center point of your support hardware. Standard adult clothing hangers measure about 17 to 18 inches across. Half of that width extends backward toward the wall.
If you mount your rail too close to the back wall, your clothes will scrape the paint every time you slide them. The hangers will sit at an awkward angle, eating up extra horizontal space. You need a minimum clearance of 10 to 12 inches from the back wall to the center of your rail. This spacing ensures standard adult hangers hang perfectly straight. It prevents sleeves from bunching against the drywall.
Best Practice: Always measure your largest winter coat on its hanger before finalizing your depth placement. Some heavy jackets require up to 14 inches of clearance to breathe properly.
You understand the structural mechanics. You know how to evaluate materials and avoid common installation pitfalls. You are ready to start planning your specific closet upgrade.
First, measure your total available linear hanging space. Next, review your existing wardrobe carefully. You must estimate the overall weight you need to support. Count your heavy suits and winter coats separately from your lightweight summer shirts. This inventory audit directly informs how many center supports you genuinely need to buy.
Grab a piece of graph paper. Sketch your closet walls. Mark exactly where your wooden studs live. Plot out your desired top shelves and hanging rails. This map helps you count exactly how many end flanges, combo supports, and rails you require. A visual sketch prevents you from buying too much hardware or discovering you lack a critical piece mid-installation.
Head to the hardware store or shop online armed with a precise list. Buy everything simultaneously to ensure finishes match perfectly.
A beautifully organized closet begins with fail-proof, high-quality hardware. Aesthetic upgrades simply cannot survive if your underlying framing lacks rigid strength. Upgrading your closet mechanics transforms a chaotic daily chore into a streamlined experience. You protect your valuable garments from wrinkling. You also protect your home from extensive drywall damage caused by collapsing shelves.
Take time to measure your current space accurately. Identify your wall studs correctly. Choose heavy-duty materials designed to handle dynamic loads smoothly. Investing in the proper framing components upfront ultimately saves you massive frustration later.
Do not wait for that ominous crack in the middle of the night. Take action now. Grab your tape measure, audit your heavy winter gear, and browse high-capacity bracket options perfectly suited for your specific wall type.
A: You should place them a maximum of 48 inches apart for standard lightweight use. However, a 32-inch span provides much safer support for heavy winter gear, thick suits, or solid wood dowels. Tighter spacing absolutely prevents annoying center bowing over time.
A: Technically yes, if you use heavy-duty toggle anchors. However, professionals highly discourage this approach for primary rails. Sliding heavy clothes creates intense dynamic load stress. Drywall anchors frequently rip out under this moving pressure. Always aim to anchor directly into solid wooden studs.
A: Open-hook designs allow you to drop the rail in from the top. They offer much easier installation and quick removal. Closed-loop designs require you to slide the rail entirely through the hole before mounting. Closed loops provide superior security against accidental upward bumps.


